

251
分类:
技术
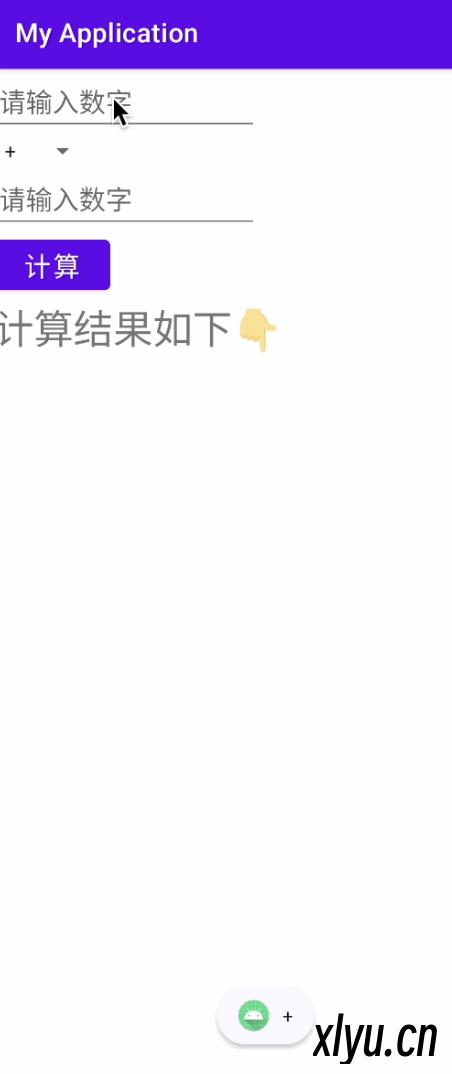
简介:示例代码day1「layout部分」<?xml version="1.0" encoding="utf 8"?>
<LinearLayout xmlns:android="http://schemas.android.com/apk/res/android"
android:layout_width="match_parent"
android:layout_height="match_parent"
android:orientation="vertical">
<EditText
android:id="@+id/et1"
android:layout_width="200dp"
android:layout_height="50dp"
android:hint="请输入数字"
android:textSize="20sp"/>
<Spinner
android:id="@+id/spinnner"
android:entries="@array/lxy"
android:layout_width="wrap_content"
android:layout_height="wrap_content"
/>
<EditText
android:id="@+id/et2"
android:layout_width="200dp"
android:layout_height="50dp"
android:hint="请输入数字"
android:textSize="20sp"/>
<Button
android:id="@+id/btn"
android:layout_width="wrap_content"
android:layout_height="wrap_content"
android:text="计算"
android:textSize="20sp"/>
<TextView
android:layout_width="wrap_content"
android:layout_height="wrap_content"
android:text="计算结果如下👇"
android:textSize="30dp"/>
<TextView
android:id="@+id/txt"
android:layout_width="wrap_content"
android:layout_height="wrap_content"
android:text=""
android:textSize="25sp"/>
</LinearLayout>array「values部分」<?xml version="1.0" encoding="utf 8"?>
<resources>
<string array name="lxy">
<item>+</item>
<item> </item>
<item>*</item>
<item>/</item>
<item>%</item>
</string array>
</resources>MainActivity变量private EditText et1,et2;
private TextView txt;主代码Spinner spinner = (Spinner) findViewById(R.id.spinnner);
spinner.setOnItemSelectedListener(new AdapterView.OnItemSelectedListener() {
@Override
public void onItemSelected(AdapterView<?> parent, View view, int position, long id) {
String result = parent.getItemAtPosition(position).toString();
Toast.makeText(MainActivity.this,result,Toast.LENGTH_SHORT).show();
}
@Override
public void onNothingSelected(AdapterView<?> parent) {
}
});
Spinner operatorSpinner = findViewById(R.id.spinnner);
ArrayAdapter<CharSequence> adapter = ArrayAdapter.createFromResource(this, R.array.lxy, android.R.layout.simple_spinner_item);
adapter.setDropDownViewResource(android.R.layout.simple_spinner_dropdown_item);
operatorSpinner.setAdapter(adapter);
Button calculateButton = findViewById(R.id.btn);
calculateButton.setOnClickListener(new View.OnClickListener() {
@Override
public void onClick(View v) {
et1 = findViewById(R.id.et1);
et2 = findViewById(R.id.et2);
txt = findViewById(R.id.txt);
double num1 = Double.parseDouble(et1.getText().toString());
double num2 = Double.parseDouble(et2.getText().toString());
Spinner operatorSpinner = findViewById(R.id.spinnner);
String operator = operatorSpinner.getSelectedItem().toString();
double result = 0;
switch (operator) {
case "+":
result = num1 + num2;
break;
case " ":
result = num1 num2;
break;
case "*":
result = num1 * num2;
break;
case "/":
result = num1 / num2;
break;
case "%":
result = num1 % num2;
break;
}
txt.setText(String.valueOf(result));
}
});
386

分类:
技术
简介:简易布局文件activity_main<?xml version="1.0" encoding="utf 8"?>
<LinearLayout xmlns:android="http://schemas.android.com/apk/res/android"
xmlns:app="http://schemas.android.com/apk/res auto"
xmlns:tools="http://schemas.android.com/tools"
android:layout_width="match_parent"
android:layout_height="match_parent"
tools:context=".MainActivity">
<Button
android:id="@+id/secbtn"
android:layout_width="wrap_content"
android:layout_height="wrap_content"
android:text="跳转到第二个Activity"
/>
</LinearLayout>layout1<?xml version="1.0" encoding="utf 8"?>
<LinearLayout xmlns:android="http://schemas.android.com/apk/res/android"
android:layout_width="match_parent"
android:layout_height="match_parent">
<TextView
android:layout_width="wrap_content"
android:layout_height="wrap_content"
android:text="这是layout1"
android:textSize="30dp"/>
</LinearLayout>java类MainActivitypackage com.example.demo1;
import androidx.appcompat.app.AppCompatActivity;
import android.annotation.SuppressLint;
import android.os.Bundle;
import android.view.View;
import android.widget.Button;
public class MainActivity extends AppCompatActivity {
@Override
protected void onCreate(Bundle savedInstanceState) {
super.onCreate(savedInstanceState);
setContentView(R.layout.layout1);
}
}IntentActivityimport android.annotation.SuppressLint;
import android.content.ComponentName;
import android.content.Intent;
import android.os.Bundle;
import android.view.View;
import android.widget.Button;
public class IntentActivity extends MainActivity {
private Button secbtn;
@SuppressLint("MissingInflatedId")
@Override
protected void onCreate(Bundle savedInstanceState) {
super.onCreate(savedInstanceState);
setContentView(R.layout.activity_main);
secbtn = (Button) findViewById(R.id.secbtn);
secbtn.setOnClickListener(new View.OnClickListener() {
@Override
public void onClick(View view) {
//实现activity跳转 显示意图跳转
/*
Intent intent=new Intent();
ComponentName component=new ComponentName(IntentActivity.this,MainActivity.class);
intent.setComponent(component);
startActivity(intent);
*/
//隐式意图跳转
Intent intent = new Intent();
//通过Action属性进行查找对应activity
intent.setAction("android.intent.newland.MY_ACTION");
startActivity(intent);
}
});
}AndroidManifest<?xml version="1.0" encoding="utf 8"?>
<manifest xmlns:android="http://schemas.android.com/apk/res/android"
xmlns:tools="http://schemas.android.com/tools">
<application
android:allowBackup="true"
android:dataExtractionRules="@xml/data_extraction_rules"
android:fullBackupContent="@xml/backup_rules"
android:icon="@mipmap/ic_launcher"
android:label="@string/app_name"
android:supportsRtl="true"
android:theme="@style/Theme.Demo1"
tools:targetApi="31">
<activity
android:name=".IntentActivity"
android:exported="true">
<intent filter>
<action android:name="android.intent.action.MAIN" />
<category android:name="android.intent.category.LAUNCHER" />
</intent filter>
</activity>
<activity
android:name=".MainActivity"
android:exported="true">
<intent filter>
<action android:name="android.intent.newland.MY_ACTION" />
<category android:name="android.intent.category.DEFAULT" />
</intent filter>
</activity>
</application>
</manifest>
273
分类:
技术
简介:示例具体代码girl「drawable部分」<?xml version="1.0" encoding="utf 8"?>
<animation list xmlns:android="http://schemas.android.com/apk/res/android"
android:oneshot="false">
<item android:drawable="@drawable/girl_1" android:duration="100"></item>
<item android:drawable="@drawable/girl_2" android:duration="100"></item>
<item android:drawable="@drawable/girl_3" android:duration="100"></item>
<item android:drawable="@drawable/girl_4" android:duration="100"></item>
</animation list>girldonghua「layout部分」<?xml version="1.0" encoding="utf 8"?>
<LinearLayout xmlns:android="http://schemas.android.com/apk/res/android"
android:layout_width="match_parent"
android:layout_height="match_parent"
android:orientation="vertical">
<ImageView
android:id="@+id/iv"
android:layout_width="wrap_content"
android:layout_height="wrap_content"
android:background="@drawable/girl"
android:layout_marginLeft="100dp"
android:layout_marginTop="20dp"/>
<LinearLayout
android:layout_width="match_parent"
android:layout_height="wrap_content"
android:orientation="horizontal"
android:layout_marginTop="25dp">
<Button
android:id="@+id/start"
android:layout_width="wrap_content"
android:layout_height="wrap_content"
android:text="开始"
android:layout_marginLeft="50dp"/>
<Button
android:id="@+id/stop"
android:layout_width="wrap_content"
android:layout_height="wrap_content"
android:text="停止"
android:layout_marginLeft="45dp"/>
</LinearLayout>
</LinearLayout>Main super.onCreate(savedInstanceState);
setContentView(R.layout.girldonghua);
iv=(ImageView) findViewById(R.id.iv);
start =(Button) findViewById(R.id.start);
stop =(Button) findViewById(R.id.stop);
//得到AnimationDrawable对象
ad =(AnimationDrawable) iv.getBackground();
start.setOnClickListener(new View.OnClickListener() {
@Override
public void onClick(View v) {
if (v == start) {
ad.start();
}else {
ad.stop();
}
}
});
stop.setOnClickListener(new View.OnClickListener() {
@Override
public void onClick(View t) {
if (t == stop){
ad.stop();
}else {
ad.start();
}
}
});
}
279

分类:
技术
简介:rotate<?xml version="1.0" encoding="utf 8"?>
<! 旋转动画 >
<rotate
android:repeatMode="restart"
android:repeatCount="infinite"
android:duration="1000"
android:fromDegrees="0"
android:toDegrees="360"
xmlns:android="http://schemas.android.com/apk/res/android">
</rotate>中心旋转android:pivotX="50%"
android:pivotY="50%"
610

分类:
技术
简介:前言之前我在GitHub上“无意”中看到了一个部署gpt的项目,觉得好玩儿,就自己部署了一个,之后就没怎么管了 没想到还有“圈钱” ,圈就算了,连源码都改不干净👇 所以咱就给大家分享一下,如何快速部署一个gpt来玩,只需要动动你聪明的头脑以及你敏捷的小手指就OK了这里我们需要用到一个GitHub的账号,没有的小伙伴可以先去注册,这里就不教大家怎么注册了登录GitHub点击这里 👈fork项目点击这里👈Repository name自己随便填就OK到这里,我们就准备好了项目文件登录Vercel点击这里👈添加项目import项目运行访问添加一个自己的域名简单修改使用页面简单修改 👇路径:app >layout.tsx路径:app >components >sidebar.tsx在99行左右其他修改其他的这里我们就不作教学了,相信你会🥰newbingAI部署源码 👇 - 隐藏 -